Pages

Subscribe:

Wednesday, December 14, 2011

Disposing SharePoint Objects

If you are using SharePoint object model, then it is very much important to correctly release resources. It should ensure that any unmannaged resources should be released as soon as they are no longer needed.Though garbage collector automatically releases memory allocated to unused objects, but it will release ina unpredictable manner. The .NET Framework provides the IDisposable interface, which exposes a Dispose method that you should call to explicitly release these unmanaged resources. To invoke Dispose method, you can use the using keyword, you can use the try/finaly code block or you can explicitely invoke Dispose method.
Example of using keyword:
using (SPSite site = new SPSite("URL of the Site Collection"))
{
// Code here
}

Internally the compiler converts the using block to try/finally block as shown below.
SPSite site = null;
try
{
site = new SPSite("URL of the Site Collection");
// Code here
}
finally
{
if (site != null)
site.Dispose();
}

The SPSite and SPWeb types both implement the IDisposable interface, and both allocate unmanaged memory. If you do not correctly release SPSite and SPWeb instances, you will probably experience memory leaks, crashes, and frequent application pool recycles.

But if they are derived from the context object then the framework will take care of releasing resources, you should not release the resources.
For example SPWeb web = new SPSite(SPContext.Current.Web.Url).OpenWeb().
Here the web object is derived from the SPContext, so we should not dispose that. Here SPWeb object web.Dispose() automatically called.

Create SharePoint list programmatically C#

In this article I am going to show how to create a SharePoint List and fields Programmatically using c#
public void CreateList()
{
    //choose your site
    SPSite site = new SPSite("http://sps2010");
    SPWeb web = site.OpenWeb();
    SPListCollection lists = web.Lists;

    //create new Generic list called "Custom List"
    lists.Add("Custom List ", "list Description",SPListTemplateType.GenericList);
    SPList newList = web.Lists["Custom List "];

    //create Text type new column called "Name"
    newList.Fields.Add("Name", SPFieldType.Text, true);

/*create lookup type new column called "Lookup Column"
    Here I am going to get the information from the "Title"
    column of a list called "LookUp List"
   * /
    SPList lookupList = web.Lists["LookUp List"];
    newList.Fields.AddLookup("Lookup Column", lookupList.ID, false);
    SPFieldLookup lkp = (SPFieldLookup)newList.Fields["Lookup Column"];
    lkp.LookupField = targetList.Fields["Title"].InternalName;
    lkp.Update();

    //make new column visible in default view
    SPView view = list.DefaultView;
    view.ViewFields.Add("Name");
    view.ViewFields.Add("Lookup Column ");
    view.Update();
}

Thursday, December 1, 2011

Custom Error Page

With 2007, you can cancel events and return an error message to the user, but that provides limited interactivity  and not much help to the user beyond what your error message says. With 2010 events, you can cancel the event on your synchronous events and redirect the user to a custom error page that you create. The custom error pages and redirection will only work for pre-synchronous events,so you cannot do this for post-synchronous events such as ListAdded.


The way to implement custom error pages is to set the status property on your property bag for your event receiver to SPEventReceiverStatus.CancelWithRedirectedUrl, set the RedirectUrl property to a relative URL for your error page, and set the cancel property to true.


      properties.Cancel = true;
      properties.Status = SPEventReceiverStatus.CancelWithRedirectedUrl;
      properties.RedirectUrl = "/_layouts/mycustomerror.aspx";

Create a User Profile Using the Object Model


public void CreateUserProfile()
{
//We have to get the Context of the service application
strUrl = "http://site";
SPSite spSite = new SPSite(strUrl);
        ServerContext siteContext = ServerContext.GetContext(spSite);
        
       //UserProfileManager class contains member for profiles
       UserProfileManager upManager = new UserProfileManager(siteContext);       
       string strUserName = "domain\\user";
       if (!upManager.UserExists(strUserName ))
       upManager.CreateUserProfile(strUserName);
}

Monday, November 14, 2011

Retention Policy for document library in SharePoint 2010


One of the major improvements in SharePoint 2010 compared to prior version is the improvements in information management policies. SharePoint 2010 can apply the expiration policy in multiple stages, where each stage can do some specific actions such as deleting draft versions, deleting previous versions, deleting the record etc. In SharePoint 2010 you can apply the retention policy to a content type, to a list or document library, to a folder.
How to create own retention policies on a Document Library
1. If a document is not modified for 2 years delete its previous versions
2. Any document created here to be deleted after 3 years.
Here are the steps to navigate to the “Shared Documents” document library to set the retention policy.
Before doing Retention policies, it requires some Configuration settings in Site and SharePoint Central Administration.
Essentially, you have to Activate the "Content Organizer" feature at the Site Level. Once that is done, you get the "Drop off Library" as well as 2 new options in the Site Settings. Content Organizer Rules and Content Organizer Settings. In that, you can take the .asmx link and then paste it in the Central Admin Configure Send to Connections. After that, the routing should work fine. Using the Rules and that is mostly using Content Types, you can route the document to the right library instead of letting it stay in the Drop off Library.

In the SharePoint Central Administration, under General Application Settings
External Service Connections, select Configure send to connections.

Here you have to configure the “Send to Connections”. After giving the URL, check to verify whether it is valid or not.

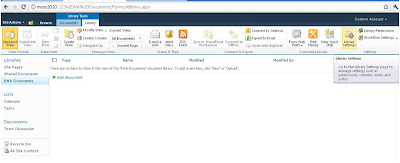
From the top ribbon, navigate to the Library tab, and then click on Library settings.
It will be navigated to the document library settings page. Click on the Information management policy settings from this page.


By default a library will inherit its policies from the content type, so that the policies set for the content type will be applied. You can change this by overriding “Source of retention for this library” property. set up retention policy for “Shared Documents” library . Click on the “change source” link.
 
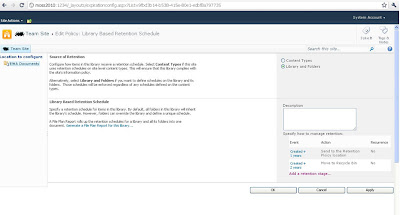
You will reach the configuration page for the retention schedule. Select the libraries and folders radio button. You will receive a warning alert stating the content type retention policy will be ignored. Click ok here.
You can see the configuration options available for document library/list here. Click on “add a retention stage" link
Based on Created and Modified, a Document can be Moved to Recycle or Delete or can be transferred to another locationas shown


Based on the requirement we can create the Retention Policies. 


Wednesday, November 2, 2011

Sandbox Solutions in SharePoint 2010

What is Sandbox Solutions in SharePoint 2010?
Sandbox solution is a new feature introduced in SharePoint 2010. It's a secured wrapper around webparts and other elements with limitations. There is no thumb rule that every webpart in SharePoint 2010 belongs to Sandbox Solution. But it's recommended to develop webparts with Sandbox solution. It allows administrators to monitor the solutions and control as required. SharePoint Site Collection administrators can view the resource utilization of each solution and can block if it consumes too much resources. Usually when sites working slow, developers complain the server is slow whereas site/server administrators blame on Develepor code/solutions. Now Microsoft put a Full Stop to that.


SharePoint solutions run in seperate worker processes and not in w3wp.exe. So It doesn't require IIS Reset or Application Pool Recycling. Without disturbing the SharePoint site, Sandbox solutions can be deployed. Only thing while deploying new version of Sandbox solution over existing solution, SharePoint will display No Solution found error in Sandbox Webparts on the page. However within seconds sandbox solutions getting deployed and it'll start working. In SharePoint 2007, only farm administrators can install/deploy developer solutions. But Now site collection administrators can deploy solutions with web based interface. This reduces the dependency of Farm Administrator and improves rapid deployment.


Sandbox Processes
Here the processes which required for Sandbox solutions.
  1. SPUCWorkerprocess.exe - Sandbox Worker process service which is a Seperate Service Application which actually executes Sandbox code. It should be started in every farm to use Sandbox solutions.
  2. SPUCWorkerProcessProxy.exe - Sandbox Worker process proxy which is working as a proxy for Worker process and takes care of Sandbox code execution. It can also serve to other farms if configured. Basically it helps site administrator for load balancing.
  3. SPUCHostService.exe - Sandbox User Code Service takes care of user code in Sandbox amd it can be started in the farms where to use Sandbox solutions.
Sandbox Limitations
 Sandbox is a secured wrapper and it has restrictions on code to run in SharePoint environment. Few Key limitations which developers should know are listed below.
  1. No Security Elevation - RunWithElevatedPrivileges which runs the specified block of code in application pool account(typically System Account) context is not allowed in Sandbox code. SPSecurity class also not allowed to use in Sandbox.
  2. No Email Support - SPUtility.SendMail method has been blocked explicitly in Sandbox, However .Net mail classes can be used to send mails. Additionaly sandbox won't allow to read Farm SMTP address. So developers has to specify the SMTP address in code itself(may be some other workaround).
  3. No Support to WebPartPages Namespace - Sandbox won't allow to use Microsoft.SharePoint.WebPartPages namespace.
  4. No Support to external Webservice - Internet web service calls are not allowed to ensure security in Sandbox solutions. Allow Partially Trusted code also can't be accessed within Sandbox.
  5. No GAC Deployment - Sandbox solutions are not stored in File System(Physical path) and assemblies can't be deployed to Global Assembly Cache(GAC). But it's available on C:\ProgramData\Microsoft\SharePoint\UCCache at runtime. Note the ProgramData is a hidden folder.
  6. No Visual Webparts - Visual Studio 2010 by default won't allow to create Visual Webparts to deploy as sandbox solution. But with Visual Studio PowerTools extensions(downloadable from Microsoft MSDN website) Visual Webparts can be developed and deployed as sandbox Solutions.
SharePoint Online which is SharePoint environment provided by Microsoft to manage SharePoint Sites in internet accepts only Sandbox solutions. Because SharePoint Online sites are Windows Servers at Microsoft Datacenters, Microsoft won't allow GAC deployment or file system access. In future Sandbox solution will give more features for developers. 

Tuesday, November 1, 2011

Configuring Sandboxed Solutions - Cannot start service SPUserCodeV4 on computer


When you built and deploy SharePoint 2010 solution using Farm it will deploy successfully.

But when you create a SharePoint 2010 solution using Sandboxed it may throw an Error

Error occurred in deployment step 'Activate Features': Cannot start service SPUserCodeV4 on computer 

The error can be easily resolved by starting the Microsoft SharePoint Foundation Sandboxed Code Service which can be accessed through the Central Administration site in SharePoint.   Open the Central Administration site and go to System Settings and click on Manage Service on server:

image

Check to see if Microsoft SharePoint Foundation Sandboxed Code Service  is running

image

If it is Stopped, then Start the Service and Deploy the Sandboxed Solutions.

Adding\Updating\Retriving\SPquery Lookup fields in Sharepoint


 “Departments” is the Lookup field for the following operations -
Adding a Lookup Item -
SPListItem listItem = myList.Items[0];
listItem["Departments"] = new SPFieldLookupValue(10, “Operations”); // Adding Operations as text and 10 as ID
listItem.Update();
Retrieving Lookup field for an item-
SPListItem listItem = myList.Items[0];
SPFieldLookupValue lookupFieldText = new SPFieldLookupValue(listItem["Departments"].ToString());
string lookUpValue = lookupFieldText .LookupValue;
Updating Lookup field for an item -
SPListItem listItem = myList.Items[0];
SPFieldLookupValue lookupFieldText = new SPFieldLookupValue(listItem ["Departments"].ToString());
lookupFieldText .LookupValue = 11; -> updates the value of the Lookup field for listItem
Retrieving all the values in the Lookup Field -
DropDownList res = new DropDownList();
SPWeb web = SPControl.GetContextWeb(Context);
web = web.ParentWeb;
SPLookupField myLookup = (SPLookupField)web.Fields[str];
SPSite site = web.Site;
SPWeb lookupWeb = site.AllWebs[myLookup.LookupWebId];
SPList lookupList = lookupWeb.Lists[myLookup.LookupList];
foreach(SPListItem lookupItem in lookupList.Items)
{
res.Items.Add(lookupItem[myLookup.LookupField];
}

Finally, SPquery for Lookup field by ID in sharepoint -
<Query>
<Where>
<Eq>
<FieldRef Name=’Departments’ LookupId=’TRUE’ />
<Value Type=’Lookup’>10</Value>
</Eq>
</Where>
</Query>

Sunday, October 30, 2011

Create a Custom Timer Job in SharePoint 2010

1. Open Visual Studio 2010 and select File –> New –Project…image
2. In the New Project window, under Installed Templates, select SharePoint –> 2010 and select Empty SharePoint Project. Give the project a Name and click OK.image
3. Enter the URL for SharePoint local site, check the Deploy as a farm solution, and click Finish.image
4. Create a new class.  Right click on the project in the Solution Explorer window and select Add –New Item…image
5. In the Add New Item window, under Installed Templates, select Visual C# –Code and select Class.  Give the class a name and click OK.image
6. The new class needs to inherit from the Microsoft.SharePoint.Administration.SPJobDefinition class. Copy and paste the following code, which creates a the constructors, overrides the Execute() method, and inherits theSPJobDefinition class: (Note: In this code example, an item is added to a SharePoint list every time the Execute() method is called.  The list called “ListTimerJob” must reside within SharePoint.)
1
2
3
4
5
6
7
8
9
10
11
12
13
14
15
16
17
18
19
20
21
22
23
24
25
26
27
28
29
30
31
32
33
34
35
36
37
38
39
40
41
42
43
44
45
46
47
48
49
50
51
52
53
54
using Microsoft.SharePoint;
using Microsoft.SharePoint.Administration;
namespace UpshotSP
{
    class ListTimerJob : SPJobDefinition
    {
         public ListTimerJob()
            : base()
        {
        }
        public ListTimerJob(string jobName, SPService service, SPServer server, SPJobLockType targetType)
            : base(jobName, service, server, targetType)
        {
        }
        public ListTimerJob(string jobName, SPWebApplication webApplication)
            : base(jobName, webApplication, null, SPJobLockType.ContentDatabase)
        {
            this.Title = "List Timer Job";
        }
        public override void Execute(Guid contentDbId)
        {
            // get a reference to the current site collection's content database
            SPWebApplication webApplication = this.Parent as SPWebApplication;
            SPContentDatabase contentDb = webApplication.ContentDatabases[contentDbId];
            // get a reference to the "ListTimerJob" list in the RootWeb of the first site collection in the content database
            SPList Listjob = contentDb.Sites[0].RootWeb.Lists["ListTimerJob"];
            // create a new list Item, set the Title to the current day/time, and update the item
            SPListItem newList = Listjob.Items.Add();
            newList["Title"] = DateTime.Now.ToString();
            newList.Update();
        }
    }
}

7. Add a Feature to the solution by right clicking on Features in the Solution Explorer window and selecting Add Feature.image
8. Right click on Feature1 and select Add Event Receiver.image
9.  A new class is created that handles the feature’s events.  Copy and paste the following code, which handles theFeatureActivated event, installing the custom timer job, and handles the FeatureDeactivating event, uninstalling the custom timer job:
1
2
3
4
5
6
7
8
9
10
11
12
13
14
15
16
17
18
19
20
21
22
23
24
25
26
27
28
29
30
31
32
33
34
35
36
37
38
39
40
41
42
43
44
45
46
47
48
49
50
51
52
53
54
55
56
57
58
59
60
61
62
63
namespace UpshotSP.Features.Feature1
{
[Guid("9a724fdb-e423-4232-9626-0cffc53fb74b")]
public class Feature1EventReceiver : SPFeatureReceiver
    {
        const string List_JOB_NAME = "ListLogger";
        // Uncomment the method below to handle the event raised after a feature has been activated.
        public override void FeatureActivated(SPFeatureReceiverProperties properties)
        {
            SPSite site = properties.Feature.Parent as SPSite;
            // make sure the job isn't already registered
            foreach (SPJobDefinition job in site.WebApplication.JobDefinitions)
            {
                if (job.Name == List_JOB_NAME)
                    job.Delete();
            }
            // install the job
            ListTimerJob listLoggerJob = new ListTimerJob(List_JOB_NAME, site.WebApplication);
            SPMinuteSchedule schedule = new SPMinuteSchedule();
            schedule.BeginSecond = 0;
            schedule.EndSecond = 59;
            schedule.Interval = 5;
            listLoggerJob.Schedule = schedule;
            listLoggerJob.Update();
        }
        // Uncomment the method below to handle the event raised before a feature is deactivated.
        public override void FeatureDeactivating(SPFeatureReceiverProperties properties)
        {
            SPSite site = properties.Feature.Parent as SPSite;
            // delete the job
            foreach (SPJobDefinition job in site.WebApplication.JobDefinitions)
            {
                if (job.Name == List_JOB_NAME)
                    job.Delete();
            }
        }
    }
}

10. Select the appropriate scope where the new feature will be activated.  Double click Feature1.Feature in theSolution Explorer window and choose the desired Scope from the dropdown menu.image
11. Deploy the solution by right clicking on the project in the Solution Explorer window and selecting Deploy.image
12. Navigate to the SharePoint “ListTimerJob” list and verify that a new item has been added with the current day/time as the title. (Note: The custom timer job , and many other services, can be modified within Central Administration site.)
13. Finished!